
Getting Started
Wether you are a photographer, an experienced artist, a game developer, or just a person interested in drawing or image editing, Paintie is for you. It is a simple and easily accessible, yet extremely powerful, online paint tool.
Getting started with Paintie is easy! Once you load up Paintie you are presented with the main application in your browser window.
Paintie works in any browser supporting HTML5 and WebGL, such as Google Chrome, Mozilla Firefox, Microsoft Edge and Apple Safari. For a full list of available features please see Features Overview.
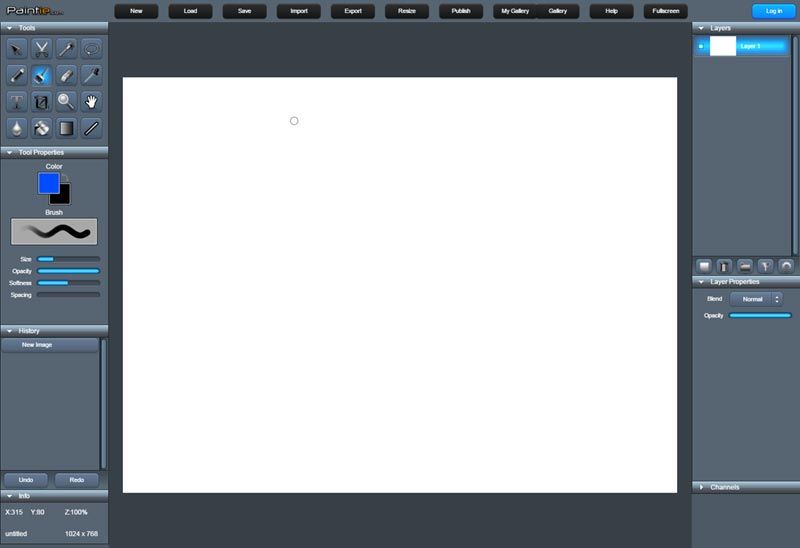
The main screen consists of a top menu and two window panes, one to the left and one to the right. The panes contain the windows for Tools, Tool Properties, History, Info, Layers, Layer Properties and Channels. For customization the windows can be moved up or down inside the panes, or moved out of the pane to detach it.
The top menu bar is your Main Menu for anything to do with user login and image files, i.e., loading, saving, importing and exporting images, or sharing, resizing or viewing galleries.
Signing Up
To sign up and start using Paintie, simply click Login in the top right corner, then click Sign up in the window that appears. Fill in your email and your desired username and password and click the Sign up button to complete the registration.
Once registered you can save and load images from the cloud, like and comment on images and freely browse galleries.
Paintie uses cookies to remember your login (unless you uncheck "Remember me" when logging in), so you don't have to enter your user information every time you visit us. To login later or on a different computer, just enter your username and password in the login window.
Forgot Password
If case you forget your password, please click on the Login button in the top right corner. After one failed login attempt with your username, the login window will display a Reset password link. Please click that and follow the instructions. An email will be sent to you with a password reset code.
Main Menu

The top menu bar has buttons for anything to do with files, e.g., loading, saving, importing, and sharing, etc. and user login / settings.
New
To create a new image, click New in the top menu. In the popup window enter the desired resolution manually, or choose
one of the presets. Default background is white, but you can also choose to start with a black or transparent background.
Load
To load a previously saved image, click Load in the top menu and choose a file from the load dialog window.
In this dialog you can also share an image so it will appear in your gallery and be viewable by others, or unshare an already shared image, or
you can delete an image.
Save
Click Save to save the current image to the cloud. Simply type in a name and select OK, and the image will be uploaded and stored on the server.
Paintie uses its own image format (.PIE) for storing layers and layer info.
If you do not want to store the image online for some reason, you can also choose to save the file to your local harddrive.
See Save And Export.
Import
To import an external image, click Import and choose a file from the file dialog or simply drag a file onto the canvas.
You will have the option to import as a new image or import as new layer into the existing image.
Supported formats are PIE (Paintie's own image format), PSD, PNG, BMP, JPG, TGA, GIF, PCX, PSD, HDR, EXR and SVG.
The PIE and PSD formats always imports all image layers, and replaces the existing image.
High-dynamic-range images, HDR and EXR, are imported as linear float16 RGBA image layers.
SVG files are imported as Vector Layers. Likewise, video files (WEBM, MOV and MP4) are imported as Video
Layers and audio files (MP3, M4A, OGG and WAV) as Audio Layers.
Export
If you want to export the current image, to post it or use it in another program, simply click Export and choose between PNG, JPG, BMP, TGA, GIF, PCX, HDR, EXR, WEBP or AVIF.
The JPG, GIF, WEBP and AVIF formats are lossy, while the remaining formats are lossless.
Only PNG, BMP and TGA formats support full transparency. The (Radiance) HDR format and the (OpenEXR) EXR format are strictly for high-dynamic-range images.
For online use, the PNG, JPG, GIF, WEBP and AVIF formats are recommended. See also Save And Export.
Resize
Click Resize to rescale your image (and all of its layers) to a different resolution.
Simply type in the desired resolution and choose between no resampling (lowest quality), Bilinear, Bicubic, and Lanzcos (highest quality) resampling.
Alternatively, choose Canvas from the Resize dropdown, to resize the Canvas. The changes the overall image resolution, but does not alter the resolution of the layers.
Share
Once you are happy with your artwork, why not share it with the rest of the world?
You can do this from the load dialog on already saved images, but you can also share your canvas directly from the main menu.
Simply click Share and choose the desired name.
This will upload and save the image and make the image visible in your gallery.
Read more under Sharing Your Work.
My Gallery
Click My Gallery to view your gallery of the images you have shared.
Others can access your gallery by visiting:
https://paintie.com/your_userid
where your_userid is replaced with
your actual userid.
Gallery
Click Gallery to visit the public gallery for all users.
Here you can browse work by other artists, search and sort your search results.
You can also view individual images and like, comment on or share them on social networks or through email.
Help
Clicking the Help button in the main menu will give you this help page.
Fullscreen
Clicking Fullscreen toggles your browser window between fullscreen and windowed mode.
To exit fullscreen, either hit the Esc key or click the fullscreen button again.
Login
When not logged in, the "Login" button in the upper-right corner will open
the login window.
User Settings Menu
When logged in, the upper-right corner displays an avatar icon.
Click on it to access the user-settings dropdown menu.
This menu has items for user profile settings, configuration settings,
welcome dialog, about dialog and a logout option.
Tools
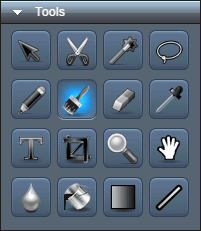
Paintie has support for a number of different paint tools, most of them accessible from the Tool window in the leftmost pane. Clicking on a tool icon will switch to that tool and the option specific to that tool will show up in the Tool Properties window just under the Tool window.
 |
Move Tool |
|
The Move tool is generally used to move the content of a layer on the 2D canvas, e.g., if the currently selected layer is either a standard bitmap layer or a text layer. If the currently selected layer is a filter layer, the move tool can be used to simultaneously control the x and y filter parameters where available. |
 |
Cut Tool |
|
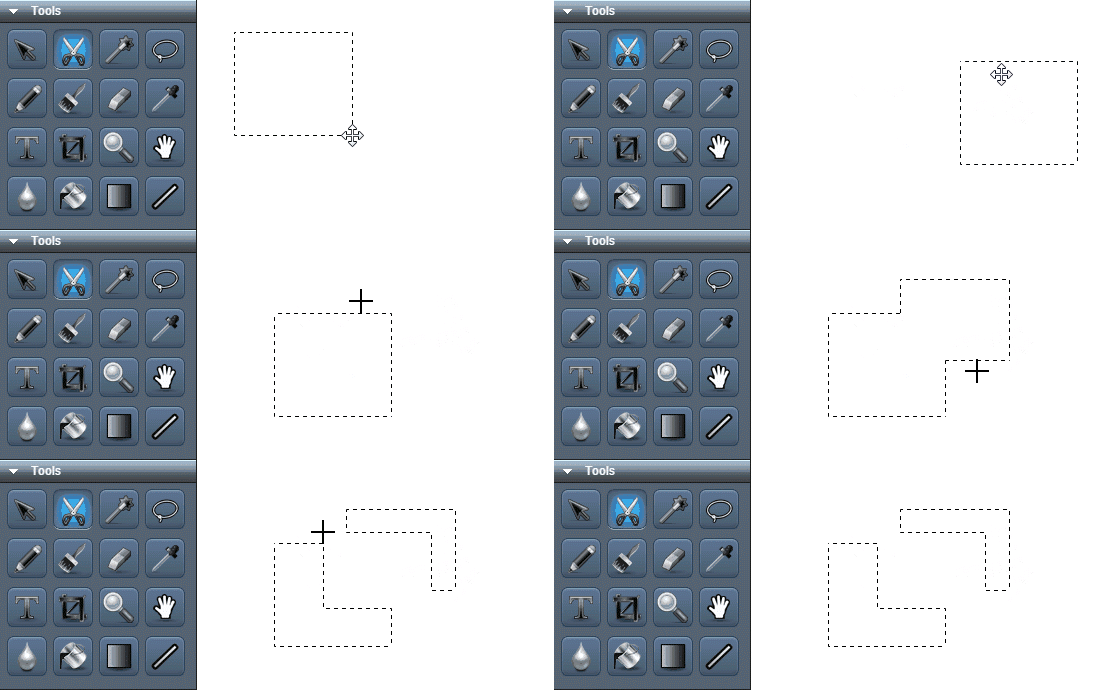
The Cut tool is used to mark a (typically) rectangular area on screen, e.g, for cut and paste. Desktop Shortcut: To copy and cut the selected area press Ctrl-X, to copy Ctrl-C and to paste Ctrl-V. In addition, holding Shift key on Ctrl-C triggers a Copy-Merged. You can also right click for more cut tool options: Copy, Paste, Cut, Copy-Merged, Delete, Select (Select All, Deselect, Inverse), Scale, Rotate, Crop and Clear Clipboard available in the context menu. Holding the Shift key (without any selection) while dragging will force the selected area to be square. Holding Shift with an already selected area, will add to that selection. Instead, holding Alt will subtract the area from the selection.
Once a selection area is chosen, any drawing tool used on the image will only happen in the selected area. The selection can be moved on the canvas by positioning the mouse cursor over the selected area and holding left mouse button and dragging. The keyboard arrow keys can also be used to move the selection 1 pixel, up, down, left and right. When also pressing the Shift key the selection is moved in 10 pixel intervals. Clicking once outside the selected area will deselect. Also hitting the Esc key will deselect the selection at any time. |
 |
Magic Wand |
Magic Wand is a selection tool that can mark a certain area of an image, where the colors are within a certain adjustable Tolerance compared to the clicked pixels color. Holding Shift with an already selected area, will add to that selection. |
 |
Lasso Tool |
Lasso tool lets you draw a certain area for selection. Choose between smooth and polygonal shaped lasso. Holding Shift with an already selected area, will add to that selection. Instead, holding Alt will subtract the area from the selection. |
 |
Pen Tool |
Pen is a drawing tool with a thin pen-style look, useful for detail or sketch style drawing as well as pixel art. In the pen selection window, accessible by clicking on the pen preview, there is a choice between a number of different looking pens, including procedural sketch like pen tools. Simple pen parameters have Color, Size, and Opacity parameters. For sketch pens, Strength parameter controls the amount of extra procedural strokes, while Fill controls the length of these strokes. Pen size can also be adjusted by holding down Shift key while using mouse scrollwheel. Enable Pixel Perfect to automatically remove redundant pixels and avoid "jaggies" when drawing clean, detailed, and precise pixel art. |
 |
Brush Tool |
Brush is a drawing tool for larger brush-like strokes, created by drawing a series of brush images. Access the brush selection window by clicking on the brush preview and choose between different looking brushes. The Brush tool parameters include Color, Size, Opacity, Softness (to smooth edges) and Spacing (controls spacing between successive brush images). Brush size can also be adjusted by holding down Shift key while using mouse scrollwheel. |
 |
Eraser Tool |
The Eraser is a drawing tool for removing image data from a layer, by making the affected area more transparent. Quite similar to the brush tool, parameters are Size, Opacity and Softness Eraser size can also be adjusted by holding down Shift key while using mouse scrollwheel. |
 |
Drop Tool |
The Drop tool samples the image color at the mouse location and stores it in the front color slot. The default is to sample the composited Image, which is the actual color seen on the canvas, regardless of which layer is chosen. Under Tool Properties you can also choose to sample just the Current Layer or the current layer composited with all layers below (Current+Below) You can also press and hold the Alt key while using the mouse, to only sample the current layer. |
 |
Text Tool |
Text tool can be used to add a text layer to an image. When clicking on the canvas a new text layer will be created, a text cursor will appear at the clicked position, and you can start typing using the keyboard. Backspace and arrows keys can be used to edit the text. Multi-line editing is supported, so Return will start a new line. To end editing, either hit Esc or shift-Return or choose a different tool with the mouse. The text tool parameters are Color, Font, Size, Outline, Spacing, Fixed Spacing and Align. Font controls the used font. Click on the font preview to change between different TrueType fonts. Size controls the rendered font size of the text and Outline controls the thickness of an optional outline drawn with the back color. Spacing sets the additional spacing inbetween letters from 0 to 100% where 100% equals the font size. The Fixed Spacing checkbox switches on fixed spacing as opposed to proportional spacing. Finally, Align switches between Left (default), Right and Center text alignment. To move a text layer to a new position on the canvas, use the Move Tool. Since the text layer is vector graphics, once the text layer has been created, any further editing of text parameters is done in the Layer Properties window. |
 |
Crop Tool |
Crop tool is for cutting or trimming an image and all of its layers. Simply hold left mouse button and drag to select the desired area. Adjust the selection by dragging the handles. When you are happy with your selection, either right click and choose Crop, or click on the crop button that appears in the Tool Properties window. The Crop tool can optionally be used to crop All Layers (default), Current Layer, or Canvas Only using the Crop dropdown option. |
 |
Zoom Tool |
Select the Zoom tool to magnify a certain area of the image to get a closer look or for detail editing. To zoom a specific area, press left mouse and drag to mark the area you want to zoom. Alternatively, double click to zoom towards a specific point, or hold Shift and double click to zoom away from the point. Note, similarly you can also use the mouse scroll wheel to zoom toward the mouse position. Finally, you can right click for the context menu, and choose between Fit on Screen, Actual Pixels, Zoom In and Zoom Out. |
 |
Pan Tool |
The Pan tool is used to navigate the view of the canvas. Hold down mouse button and drag to pan the canvas. You can choose the pan tool directly in the tool window, but when using another tool, you can also switch to the pan tool temporarily by holding down spacebar or using the middle mouse button. When pan tool is selected, right clicking to get context menu, gives you the option to reset and center the pan at any time. Desktop Shortcut: Alt-Ctrl clicking on a layer in the Layers Window, selects and pans that layer into view. |
 |
Blur / Smudge Tool |
The Blur tool works kind of like the brush tool, but instead of drawing, it blurs the image inside the drawing region. Running the blur tool over the same image region several times will make the region more blurry. You can also use the similar Smudge tool, which still blurs but also distorts the image, kind of like smudging paint with a finger. Alternatively, the Clone tool can be used to paint using a region from a different location in the layer. First hold the Alt key (or long touch on touch devices) and click to select the location to copy from. A crosshair will show the location on the canvas. Then start drawing anywhere in the layer to clone that region. Blur/Smudge and Clone size can be adjusted by holding down Shift key while using mouse scrollwheel. |
 |
Fill Tool |
The Fill tool can be used to flood fill anywhere on an image. The selected Tolerance determines how different the pixels can be from the clicked pixel in the area to be filled. If a selection is made and the fill tool is used inside the selected area, the entire selected area will be filled, and the tolerance parameter will be ignored. The Antialiased option will when enabled fill across antialiased sections in the fill area. |
 |
Gradient Tool |
The Gradient tool is like the Fill tool, but instead of filling with a constant color, it fills any selected area with a linear gradient between the front and the back color. Hold mouse and drag to define the line where the gradient should start (front color) and stop (back color). To avoid banding the Dither parameter can be used to control how much noise is added to the gradient. |
 |
Shape Tool |
Shape tool can be used to draw lines, squares / rectangles and circles / ovals. Hold mouse and drag to define the area where the shape should be drawn. For lines the Line Size parameter controls the thickness of the line. For all shapes, the Outline parameter also determines the thickness of an optional outline. The outline color used is the back color. Holding Shift key will restrict lines to vertical, horizontal and 45 degrees, or restrict rectangle / ovals to squares and circles. |
Context Menu
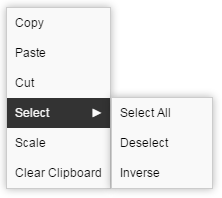
Many tools have a context menu that allows you to access certain features specific to that tool. To make it appear, simply right click in your browser, or long tap on touch devices. The select tool is a useful example (shown above), as it contains options for altering the selection, like Select All, Deselect or Inverse selection. Another useful context menu is for the magnify tool, which allows you to, e.g., zoom the current image to Fit On Screen, or show it as Actual Pixels.

Context menus do not just apply to tools however. Also certain windows have context menus enabled. Right clicking or long tapping (on touch) a layer in the Layers Window, shows the context menu (above) and allows you to Duplicate, Delete, Merge Down, Flatten and Select the clicked layer.
Colors
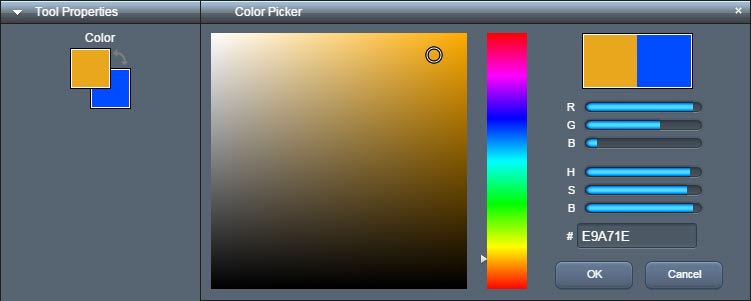
Tools that have a color parameter, have a color selector shown as one or two squares with solid color. When two squares are shown, it means that the tool has a primary color and secondary color, called the front color and the back color. Tools with just one square, only have one color. The front color is always the primary color use for drawing / filling, etc. The back color is in certain tools also used, e.g., for outlines and gradients. You can swap the front and back color by pressing the X key or by clicking on the small arrow next to the squares.
Clicking on one of the squares will open the Color Picker (as shown above), used for selecting a new color. The color picker has a 2D Saturation/Brightness selector and a 1D Hue selector. Clicking on one of these will adjust the chosen color accordingly. Alternatively, the sliders to the right of the selector lets you adjust the Red(R), Green(G) and Blue(B) components of the color or the Hue(H), Saturation(S) and Brightness(B) directly.
A Hex(#) text field shows the 24 bit RGB Hex code for the color, either for copying it to the clipboard for use in other programs or for editing it directly. Clicking OK will change the color to the edited color (and close the Color Picker), whereas clicking cancel will discard changes and revert to the initial color. The color display in the top right corner shows the edited color compared to the initial color.
Layers
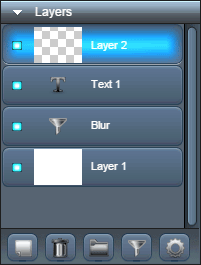
Layers are what make almost any paint program so powerful. Instead of having just one image to draw to, layers allows you to have many images composited in the order defined by the layers position in the layer stack. The layer stack is shown in the Layers window in the right most pane. Layers are drawn in order, where the bottom layer is drawn first, and the top-most layer last.
Clicking on a layer will switch to that layer and make it the current editable, drawing layer. Once a layer is selected, its properties will appear in the Layer Properties window, also located in the right pane. Standard (image) layers have Blend Mode and Opacity properties that define how the layer blends with the layers beneath it. Other layer types can have more properties.
Typical blend modes are supported: Normal (Alpha blending), Add (Linear add/dodge), Screen (Relative add), Multiply, Subtract, Difference, Darken, Lighten, Overlay, Hard Light, Color Dodge, Color Burn, Linear Light, Vidid Light and Pin Light.
A layer can be moved up or down in the layer stack, by holding left mouse and dragging. Once the mouse button is released, the layer will be moved and inserted at the new position. A layer can be made invisible/visible by toggling its small LED icon.
Layers can be grouped into a Group Layer to make it more managable. The layers in the group are then pre-blended together before blending it with the non-grouped layers, using the blend mode and opacity properties of the group layer.
Simple layer editing is controlled by the row of iconized buttons at the bottom of the Layer window:
 |
New Layer |
Creates a new standard, transparent, image layer for editing / drawing. |
 |
Delete Layer |
Deletes the selected layer (or layer group) and removes it from the layer stack. |
 |
Group Layer |
Creates a group layer with the currently selected layer as its first element. |
 |
New Filter Layer |
Creates a new filter layer. Filters are adjustment layers that alter the blended layers beneath the filter layer in some way. To learn more about filters see Filters. |
 |
Layer Settings |
Edit and modify layer settings, like renaming a layer or change its type or format. |
Right clicking on a layer bring up the context menu for the clicked layer:
Duplicate
Duplicates the layer, i.e., creates a identical copy of the layer and places it just above it on the stack.
Delete
Deletes the layer, just like clicking on the delete button.
Merge Down
Blends and merges the selected layer with the one just below it. The blend mode for the layer is kept, if they match. If executed on a stack of filters above a standard image layer, the entire filter stack is merged. If executed on a group, the group layer is merged and converted into a standard image layer.
Flatten All
Collapses all layers and turns the image into a single standard image layer. All other layers are removed.
Flatten To Layer
Merges all layers below the selected layer into a single standard image layer and places it on the stack. No layers are removed. If the selected layer is inside a group, only the layers inside the group are merged.
Select Layer
Selects the content of this layer only using the selection mask tool. Desktop Shortcut: Ctrl clicking on a layer in the Layer Window has the same effect. Ctrl-Alt clicking on a layer selects that layer and pans selection into view.
Select Flattened
Selects the content of this layer and all layers below it using the selection mask tool. Desktop Shortcut: Ctrl-Shift clicking on a layer in the Layer Window will Select Flattened that layer.
Center Layer
Centers the selected image or text layer on the canvas.
Settings...
Shows layer settings window for selected layer. Here you can change layer settings or rename a standard image layer, text layer or group layer. Filter layers cannot be renamed.
Move To Front
Moves selected layer to front (top of layer stack).
Move To Back
Moves selected layer to back (bottom of layer stack).
Move To Group
If the image has any Groups, this moves the selected layer to the top of the chosen group in this submenu.
Filters
Support for real-time filters is what makes Paintie both powerful and unique. A filter is an adjustment layer, placed on the layer stack. Hence, compared to a regular image layer, a filter will not just blend an image, but instead manipulate and alter the resulting image at the position it is placed in the stack. For instance, a Contrast filter will change the contrast and brightness of the resulting collapsed image of all the layers beneath it in the stack.
The application of a filter is non-destructive. This means that no destructive changes are made to the other image layers as you adjust the filter. Furthermore, filters are applied in real-time, which means that you can edit filter or even draw into image layers above and beneath the filter, while seeing the final composited result instantly on the canvas. So you can always go back and readjust a filter, remove it or reposition it in the stack, if you decide that this works better in your image, without resorting to undo/redo.
Typical filters include simple color manipulation operations, such as Contrast, Brightness, Hue+Saturation, Color Transform, etc.
But filters can also completely alter the image by using distortion, like the Ripple, Twirl or Perspective filter
or even partly or completely replace it in the case of procedural filters, such as the Noise filter or the Lens Flare filter.
See the Filters Overview for the full list of available filters.
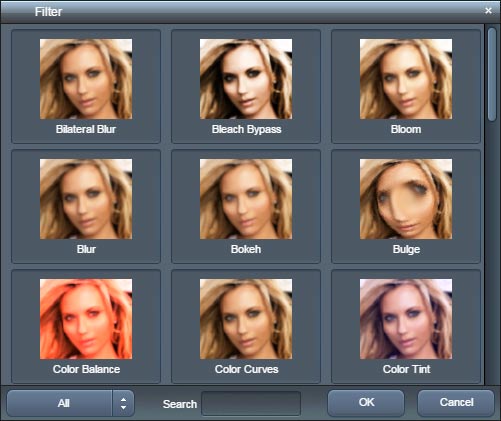
To create a new filter layer, click on the New Filter Layer icon button in the Layers window. The default filter layer added is always a Contrast filter with parameters set to not affect the image. To choose a different filter, click on the Filter selector in the Layer Properties window. The Filter Picker window (shown above) will popup showing you a preview of the different filters applied to your image. You can scroll, and click on each of the filters to preview how it will look in the canvas with this filter. You can also edit the filters parameters in the Layer Properties window, to try out different settings.
Note, that none of these edits are stored in the undo stack in the History Window, which makes it easy to try out different settings without destroying your existing image. To accept and apply the filter click OK in the Filter Picker window. In case you forget, and click somewhere else, a message popup will appear and ask if you wish to apply the chosen filter settings. Clicking Cancel, will revert the filter changes to the settings prior to editing.
Undo / Redo
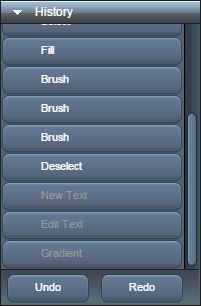
Paintie has undo and redo functionality, exposed in the History window located in the left most pane. Any tool action that alters the canvas, layers or selection masks in any way, will show up as an item in the History window. To undo the action simply click on the Undo button in the History Window (alternatively hit the Ctrl-Z key).
Once an action is undone, the item is grayed out, which means that the action is still available on the undo stack, but hasn't been executed. To execute and Redo the action, click the Redo button (alternatively Ctrl-Y or Ctrl-Shift-Z). The action item will turn white again, to indicate that the action has been executed.
Using undo and or redo many times in a row will undo and redo just as many actions. Alternatively, clicking on an item in the History window will undo or redo items until just that specific action has been executed.
History information is not kept between loads and saves of images, so any history information is lost once a saved image is reloaded.
Save And Export
Save Dialog

Saving your work is easy. Simply click the Save button in the main menu (or hit the Ctrl-S hotkey), fill in a suitable name and click OK. The image will then be uploaded and stored on the server, for easy retrieval wherever you are.
You can also choose to save the file to your local harddrive, by changing the Store dropdown from "Online" to "To Disk...". In that case your image will not be uploaded, but simply saved on your computers harddrive. To avoid data loss and to retrieve your images from multiple devices, it is recommended to save "Online".
The entire image is saved, including all groups, filters, layers, etc. as Paintie uses its own image format (.PIE) for storing layers and layer info.
Once an image is saved Online is can be retrieved using the Load button in the main menu, where it will show up as a thumbnail image in your list of files. To load an image from local disk, simply drag the file into view or use the Import dialog.
Export Dialog
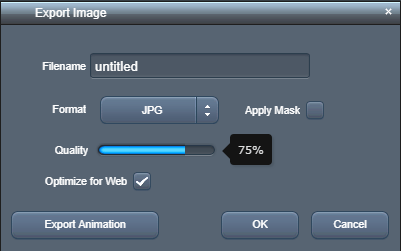
Once done with your image, you might want to export it for use in another program, to show it to a friend, post on the web, etc. Simply click Export in the main menu. A dialog will appear where you can chose a name for the resulting image, and your preferred image format. You can choose between PNG, JPG, BMP, TGA, GIF, PCX, HDR, EXR, WEBP and AVIF. JPG, GIF, WEBP and AVIF are lossy, and hence have a Quality slider, while the remaining formats are lossless. Only PNG, BMP and TGA support full transparency. The HDR and EXR formats are strictly for high-dynamic-range images. The PNG/JPG "Optimize for Web" option, performs size optimization for faster loading and display on websites. For online use PNG, JPG, GIF, WEBP and AVIF are the recommended image formats.
Sharing Your Work
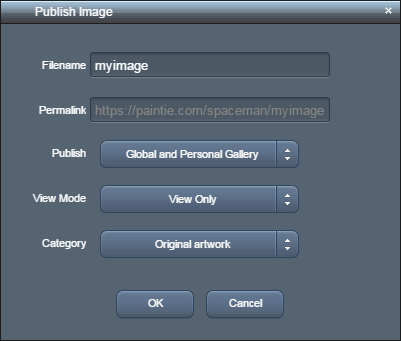
Once you are happy with your artwork, why not share it with the rest of the world?
Simply choose Share from the Main Menu and enter the desired name in the share dialog that appears.
This will upload and save the image and make the image visible in your gallery.
You can choose if the image should be Public, Personal or Private.
Public means visible in the public gallery and personal gallery, while Personal means visible only in your personal gallery.
Private means that only people with the permalink will be able to see your image, i.e, unlisted and not shown in any gallery.
You can also choose if the image should be downloadable, in which case other users can download a high quality (PNG) version of your composited image.
Finally, you can mark the image as editable, in which case others will be able to load it and re-edit it.
Default is View Only, which means non-downloadable, non-editable.
For better search filtering, we recommend that you also choose an image category.
I.e., is it original artwork, a photo edit or something else.
Images that are not shared are only viewable and editable by you, when you are signed in.
Shared images, that are not private, can be viewed by anyone in your personal gallery, available at:
https://paintie.com/your_userid
where your_userid is replaced with
your actual userid.
Alternatively, a single image can be viewed directly by using the permalink:
https://paintie.com/your_userid/your_image_name
where your_userid is replaced with
your actual userid, and your_image_name is replaced with the actual image name.
Shared private images can only be viewed by others through their respective permalink urls.
If you at any point change your mind, you can always unshare images again from the load dialog.
Hotkey Overview (Desktop)
| Ctrl Z | Undo last action in the history window. |
| Ctrl Y | Redo last action in the history window. |
| Ctrl Shift Z | Redo last action in the history window. |
| Ctrl C | Copy current selection to clipboard. Hold Shift to Copy Merged. |
| Ctrl X | Cut (i.e, copy and delete) current selection to clipboard. |
| Ctrl V | Paste clipboard into new layer. The content of OS clipboard will be pasted if available. |
| Del | Delete mask area if mask is selected (clipboard is not changed). Otherwise deletes current layer. |
| Ctrl D | Deselect current selection. |
| Ctrl J | Duplicate current layer (Jump Copy). |
| Ctrl L | Creates new standard layer. |
| Ctrl F | Creates new filter layer. Holding Shift adds filter as attachment layer. |
| Ctrl E | Merge Down current layer, if applicable. |
| Ctrl S | Save current image. |
| Ctrl ' | Toggle Grid. |
| Ctrl + and - | Zoom in and out. |
| Ctrl 1 - 9 | Zoom 1x(100%), 2x(200%), 3x(300%), 4x(400%) etc. |
| Ctrl Shift 1 - 9 | Zoom 1x(100%), 1/2x(50%), 1/3x(33%), 1/4x(25%) etc. |
| Ctrl 0 | Reset Zoom. Retrigger to restore to Zoom before reset. |
| A | Move tool (arrow). |
| B | Brush tool. |
| C | Crop tool. |
| E | Eraser tool. |
| F | Fill tool. |
| G | Gradient tool. |
| H | Pan tool (hand). |
| I | Drop tool (eye drop). |
| L | Lasso tool. |
| M | Select tool (mask). |
| P | Pen tool. |
| R | Blur tool (retouch). |
| S | Shape tool. |
| T | Text tool. |
| W | Magic Wand tool. |
| X | Swap front and back colors. |
| Z | Zoom tool. |
| 1 - 8 | Tool select first 8 tools from tool window. |
| Shift 1 - 8 | Tool select last 8 tools from tool window. |
| Spacebar | Hold Spacebar to temporarily switch to the pan tool. |
| Alt | Hold Alt to temporarily switch to the drop tool. |
| Tab | Toogle interface GUI on/off. |
| Alt [ and ] | Change current layer index. |
| [ and ] | Change index of selected color in Palette window. |
| < and > | Change Pos one frame backwards or forwards in Animation window. |
| / | Play or Stop animation. |
| Esc | Will deselect if a selection has been made or crop area has been chosen. Also cancels certain operations, like e.g., Scale, Text layer edit. |
Legal
Paintie is Copyright © 2014 - 2026 Paintie.com. All Rights Reserved.
Paintie was developed with help from these 3rd-party libraries:
opentype: Copyright © 2017 Frederik De Bleser. (MIT license)
fflate: Copyright © 2023 Arjun Barrett. (MIT license)
gif: Copyright © 2013-2018 Johan Nordberg. (MIT license)
libgif: Copyright (c) 2011 Shachaf Ben-Kiki. (MIT license)
psd: Copyright © 2012 imaya. (MIT license)
screenfull: Copyright © 2018 Sindre Sorhus. (MIT license)
filesaver: Copyright © 2016 Eli Grey. (MIT license)
canvas-toblob: Copyright © 2016 Eli Grey and Devin Samarin. (MIT license)
webm.writer: Copyright © Nicholas Sherlock. (WTFPLv2 license)
worker-create: Copyright © Zevero 2015. (MIT license)
stripe-checkout: Copyright © 2017 Stripe. (MIT license)
mp4info: Copyright © 2016 Dantigny Francois.
mp4-wasm: Copyright © 2017 Matt DesLauriers. (MIT License)
float16: Copyright © 2017-2018 Kenta Moriuch. (MIT license)
exr-wrap: Copyright © 2018 Disney Research (Apache license) / Copyright © 2006-2019 OpenEXR a Series of LF Projects, LLC. All rights reserved. (Modified BSD license)
tga: Copyright © 2013 Vincent Thibault. (MIT license)
pcx: Copyright © 2018 Nicolas Ramz & Aleksandr Korotaev (MIT license)
facebook-api: Copyright © 2017 Facebook, Inc.
google-api: Copyright © 2017 Google, Alphabet Inc. (Apache license)
cordova: Copyright © 2019 The Apache Software Foundation (Apache license)
jsquash-avif: Copyright © 2020 Google Inc. (Apache License)
mozjpeg: Copyright © Mozilla, Thomas G. Lane, Guido Vollbeding 1991-2016. (MIT license)
This software is based in part on the work of the Independent JPEG Group.